Share the Heat - Center for Enamel Art Blog
  • Home
  • About
  • Programs
    • Workshops
    • Exhibitions
  • News
  • Blog
  • Contact
  • * Support The Center for Enamel Art *

Tools and Supplies: A Conundrum, Part 1

By Judy Stone
 on April 14, 2017

Here is a conundrum: If vitreous enamels, and related tools and supplies, aren’t readily available, people can’t enamel.  If people can’t enamel, suppliers can’t sell supplies.  This chicken-and-egg problem is a huge obstacle for the growth of enameling in the U.S. and worldwide. How do people who use vitreous enamel deal with this conundrum? How does it shape enameling today, and how will it affect enameling’s future?

Share the Heat is pleased to announce a series of blogposts about tools and supplies for the enameling community. We will be examining the state of supply availability in interviews with several small independent U.S. suppliers, including Coral Shaffer of Enamelwork Supply, and Scott Ellis of e-namels.com. We will also be posting insider tips on how to find supply resources.

  • Part 1 of this introduction will give a little background and recent history in order to put the tool/supply conundrum into perspective. It will focus on why supplies, especially enamel powders  are not easy to find; why there is not much diversity in enamels that are available for sale; and why quality and customer service are sometimes problematic.
  • Part 2 will be about industrial enameling supplies and tools specific to enameling, such as firing  and application tools.
  • Part 3 will focus on how the internet has changed availability and information about supplies and supply sources.

The Center for Enamel Art is committed to helping enamelists in their professional development. We believe strongly in the sharing of resources of all kind. We hope that this series of posts begins a much-needed discussion about one problem that has hindered the growth of enameling as a recognized art medium.


Where have all the manufacturers gone?

putting enamel in a ball mill

Before Thompson

First, let’s look at the evolution of enameling in the U.S. over the last hundred years.  Read More →

In categories Technical, Tools & Supplies Tagged with accessibility, bricks and mortar, discounts, enamel, enamel manufacturers, enamel suppliers, enamels, equipment, profits, store, suppliers, Thompson enamel

Technical challenge: Liquid enamel on formed copper

By Center for Enamel Art
 on January 6, 2017
20161116_143201

Untitled (Tenement), 2007, 17″ x 8″ x 4″, copper, brass, chain

Enameling is an art, but it is also a technical process, and part of the art is solving the technical challenges. As enamelists know, these challenges inevitably seem to arise when one is working alone, often with limited equipment and access to resources. Creativity and a willingness to experiment are assets, and so is knowing where to find advice. Such problem solving is worth it, as expands the parameters of the medium. Our blog editor, Lauren, works with enamel as well as writes for a living, and she has shared with us her problem-solving process for a recent piece.  Please feel free to comment on her post and add your own insights.

-Judy Stone


I recently accepted a commission to create a larger version of a small sculpture I made years ago. The original, about 17″H x 8″W, would need to be scaled up to about 4 or 5 feet tall, which presented a few challenges. How would I replicate each part at a larger size? What should the final size be? I knew I needed to outsource the assembly of the frame and discs to a steelworker, as that exceeded my studio’s capabilities (and mine). I found a thick copper chain that mimicked the industrial look of the original at the correct scale, and I could forge connections from thick copper wire I bought at Home Depot. That left the white hanging elements, which were formed from copper and enameled.

In the original, these were only a few inches tall. I realized that the final size of the scaled-up version would be limited by the maximum size of the work I could fit in my kiln, a Vcella model 13, with interior dimensions 12″ x 12″ x 8″. I figured I could make pieces as large as about 15″ long, if I could set them in the kiln diagonally. Based on the proportions of the original, this would allow me to increase the dimensions by a factor of about 4, for a final height of about 5 1/2 feet.

20161025_123630_resized

Sheet copper

For the copper, I experimented with both 26 and 30 gauge sheet (I got mine from Basic Copper), and settled on 30 gauge for its combination of strength and pliability when annealed to dead soft. For the enamel I chose Thompson liquid 533, a white I liked for its opacity and the luminous, chalky finish that it took with an acid etch. The folks at Thompson advised me to buy a 5lb box in powder form. Easier to work with than the pre-mixed liquid, they said, and a better value for a large project like mine.

I heated the copper in my kiln to anneal and degrease it, set to work at my bench, and soon had a whole flock of formed pieces. I heated each one again to degrease.

Now for the enameling.

Forming pieces to be enameled.

I started by pouring on thick yogurt-consistency enamel, using a wide brush to spread it into crevices. I tapped and shook the piece until the enamel covered evenly and brush marks disappeared, then dried it with a heat gun until the water steamed off. My initial firings looked good except for a few small areas where the enamel was lumpy and had even peeled up from the copper in places. Was it a residual area of grease, or clumps of powder in the liquid? In previous projects I had found the 533 to be easy to work with, with good coverage that hid a multitude of sins. I figured the issues would resolve with additional firings.

My basement workbench.

As I continued to work, though, the trouble spots kept popping up, unpredictably.   The lumpy, uneven splotches were impossible to smooth or cover. I needed some expert assistance. I called Thompson Enamel, and was connected to Tom Ellis, the company’s chief product developer. Talking to him was like pulling back the curtain on the Wizard of Oz. Ah, so this is how the magic happens!

Liquid enamel wants to contract into balls when it melts, he told me, and this tendency is exacerbated when the surface to be enameled is uneven. Were there ridges or creases in my copper? There were, where I had overworked it or changed the shape more than once or twice. Dipping might help, he said, or spraying, if I could get my hands on an industrial sprayer (I couldn’t). Barring that, I should try to keep the copper as smooth as possible. I wondered if firescale could be a problem, because I had not tried to avoid it, but he assured me that it was not.

I kept testing pieces, discarding a great many failures, and trying to improve the process. The biggest issue seemed to be getting the enamel to flow smoothly over the copper. I noticed that areas of the copper that were wet when I applied the enamel seemed to take the enamel much more thinly and smoothly, with no lumping or flaking. What if I thoroughly wet a piece under the faucet before pouring on the enamel?

That worked.

Applying enamel to wet copper produced a thin, uniform, super-smooth layer that took additional coats easily. Dark green oxidation was visible in the thinner spots under the enamel, but this disappeared with an additional coat, and I didn’t mind it anyway. I experimented with Klyr-Fire, but it didn’t work as well as plain old water.

Final! About 5 1/2 feet tall, the piece will be installed in a restaurant in London.

Working against a deadline, I was glad I had not waited to start the enameling. Working larger was not simply a matter of sizing up. It required a different way of thinking and a different set of techniques.

It also changed my ideas of what I wanted to make. I had always worked small, using the techniques I had learned studying jewelry-making. But challenging myself to work large made me see new possibilities in enamel as a legitimate sculptural medium. I imagined large forms, perhaps with welded steel frames, clad in enameled copper — forms that had both the physical presence of sculpture and the subtlety and expressiveness of color. Now, there was more to learn. –LP

In categories Uncategorized

Finished! Kat Cole Installs Her Piece

By Center for Enamel Art
 on October 11, 2016

This is the last in a series of posts by enamel artist Kat Cole about a public installation she created at KVO Industries and installed in the Cedars neighborhood in Dallas. This post previously appeared on her blog. Thank you, Kat, for sharing the journey with us!


1472146641804
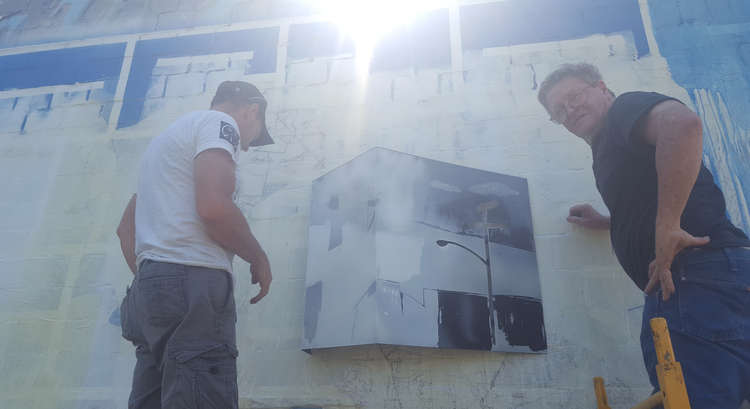
There is no shortage of things to get done with a project of this size, I am realizing. Once the work was crated up and safely on its way back to Dallas, I spent a few extra days in California with my husband, a brief bit of down time.  When I returned, Read More →

In categories Creativity, Events, Exhibitions, Uncategorized Tagged with Angela Faz, Kat Cole, Scott Shubin

Kat Cole Enamels Her Work at KVO Industries, Part 3

By Center for Enamel Art
 on September 26, 2016

This is the eighth in a series of guest posts by the enamel artist Kat Cole. This post previously appeared on her blog. 

kvo-3-1
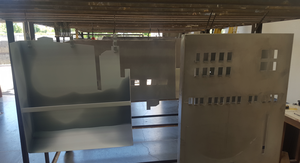
The process of enameling at KVO was a bit of a fast – slow – slow pace. I would have windows of time that I would have my spray gun ready to hop into the spray booth and get a coat on during the workers’ breaks. Their workday would usually begin at 6am and go until 3pm. I got into the habit of getting there around 7am, enjoying the time just being in the space and listening to the guys chat. They were all helpful and knowledgeable about the various processes. Read More →

In categories Creativity, Technical, Uncategorized Tagged with industrial enameling, Kat Cole, KVO Industries, public art

Kat Cole Enamels Her Work at KVO Industries, Part 2

By Center for Enamel Art
 on September 21, 2016

This is the seventh in a series of guest posts by the enamel artist Kat Cole. This post previously appeared on her blog. 


kvo-2-1

Grey panels

By the end of my first day at KVO Industries my crate had still not arrived and I was beginning to panic.  My time was limited to this one week in Santa Rosa, and if the crate did not arrive and I did not get the work done, I would have no option but to pack it back up and send it back home to Dallas unfinished. And, while I was renting time and space at KVO, I still had to be courteous of the workers’ spraying and firing schedule. 

kvo-2-2

The memorial panels in process

The week I was there was a busy one.  They had just begun on a big order for a large number of blank grey panels that would be used for changeable vinyl signage at a university. Also that week, they were working on a series of prototype photo collage panels for a funeral home that would be mounted on headstones. The use of durable enamel signage for grave makers was not a use that had occurred to me before, but turns out to be a growing market.

I began my second day at KVO with still no crate, and spent the morning calling the freight company and working on samples. I would be using a combination of Thompson Enamels and KVO’s in-house mixed enamels. I had worked with this combo at home, but knew you could never do too many samples, and something new always comes up working in a new space.

To clean the surface of small parts, they taught me to take old liquid enamel and rubbed it all over the piece, allow it to dry then brushed it off. Worked like a charm, all oils and dirt removed.

kvo-2-3
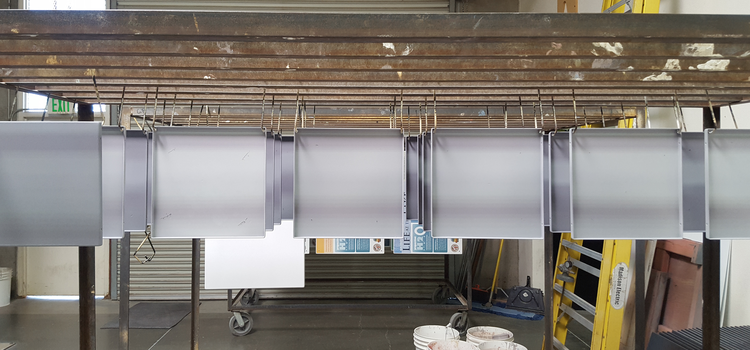
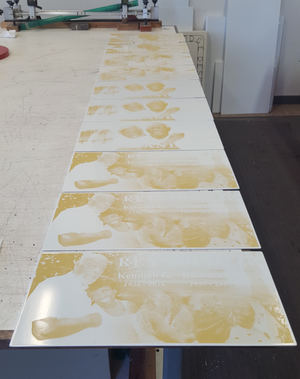
Finally midday my crate arrived and work would really begin.  The panels would need to be sanded in the areas where rust had begun to form and a few needed additional tabs added for hanging.  The interior of the KVO kiln is eight feet long and seven feet high and three feet deep.  There are hanging tracks on both sides so during high production they do not have to wait for a load to cool and be unloaded before doing the next firing.  By the end of my second day the panels were washed and ready to begin work.
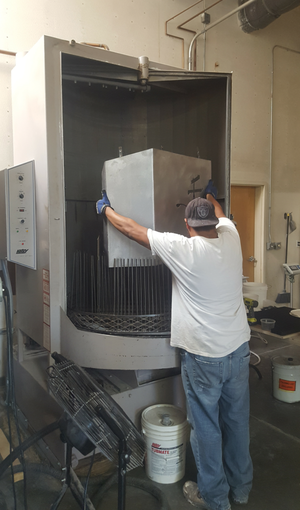
Panels going into the parts washer for a good cleaning

Panels going into the parts washer for a good cleaning

In categories Creativity, Technical, Uncategorized Tagged with industrial enameling, KVO Industries, Santa Rosa, steel enameling, Thompson enamel
← Previous Page
Next Page →

Subscribe via Email

What is this Blog About?

enameled copper California Now porcelain enamel enameling enameled steel Richmond Art Center workshops The Crucible enamel KVO Industries large scale enameling radical enameling liquid enamel experimental enamelist industrial enameling cloisonne Fred Ball Kat Cole enamel on steel

Search

Recent Posts

  • “There and Not There:” The Enamel Art of René Roberts
  • Place as Landscape / Place as Concept: Contemporary Enameling in the U.S.
  • The Nature of a Place: Harlan Butt’s Enameled Vessels

Recent Comments

  • Judy Stone on Place as Landscape / Place as Concept: Contemporary Enameling in the U.S.
  • A Lifeline for Enamelists: Coral Shaffer and Enamelwork Supply :: Center for Enamel Art on Tools and Supplies: A Conundrum, Part 1
  • W.G Ball on Tools and Supplies: A Conundrum, Part 1

Blog Archives

  • June 2019
  • January 2019
  • October 2018
  • May 2018
  • April 2018
  • February 2018
  • December 2017
  • November 2017
  • August 2017
  • May 2017
  • April 2017
  • January 2017
  • October 2016
  • September 2016
  • August 2016
  • July 2016
  • June 2016
  • May 2016
  • December 2015
  • September 2015
  • August 2015
  • July 2015
  • June 2015
Center for Enamel Art
Copyright © 2025 All Rights Reserved
Design Customized by Clear Light Communications